Wednesday 9 October 2013

How to turn your iPad into a digital picture frame

How to make the iPad into a digital picture frame
A nice feature of the iPad is its ability to also become a digital picture when it is locked. Due to the sharp and vibrant screen of the iPad this feature will turn the iPad into one of the nicest digital picture frames that I have ever seen. While the picture frame is active, the iPad will scroll through the available pictures and, by default, display them randomly.
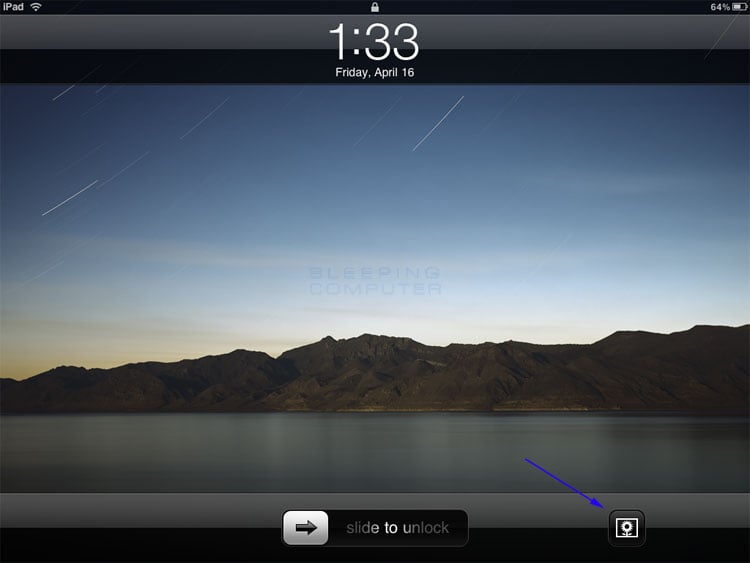
To enable the iPad digital picture frame, you first need to be at the lock screen as shown below.

iPad Lock Screen

iPad Lock Screen

To start the picture frame, tap on the picture frame button designated by the blue arrow shown in the picture above. Once you tap on that button, the iPad will start displaying random pictures from your selected albums. When you are ready to start using your iPad again and stop the picture frame, just tap the screen to get back to the lock screen and unlock it.

iPad Picture Frame settings
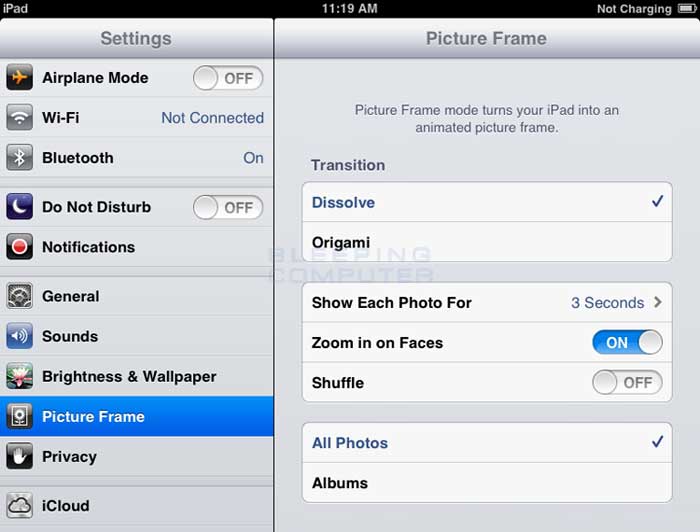
How the images are displayed in the picture frame can be changed through the Picture Frame Settings screen. To access this screen, tap the Settings button and then tap on the Picture Frame category. You will then be presented with a screen similar to the one below.

Picture Frame settings

Picture Frame Settings
The description of each of the settings can be shown below:
Transition - Dissolve: If this option is checked, each time a new the frame transitions to a new picture, the previous picture will dissolve while the new picture appears.
Transition - Origami: If this option is checked, the pictures that are displayed will be shown unfolding and in multiple sections like origami. Please note that when this option is selected, the picture frame will not zoom in on faces.

Example of Origami setting

Example of Origami setting (My kids animals, not mine!)
Show Each Photo For: This option lets you specify how long you want each individual picture to stay on the screen.
Zoom in on Faces: If this option is checked, when a picture is displayed, the iPad may display the picture zoomed in on a face. This option is only available if you are using Dissolve transitions.
Shuffle: If this option is checked, the picture frame will display pictures randomly.
All Photos: If this option is checked, the iPad will display pictures from all the albums on the iPad.
Albums: If this option is selected, then you can specify the specific albums that you would like the picture frame to display pictures from.
Once you have the Picture Frame settings configured as you wish, you can press the Home button to get back to your home screen.
As always, if you have any questions regarding this process, feel free to ask in the iPad forum.

source

How to force quit a program on a Mac

When using an application on a Mac it may become unresponsive and become frozen. When an application is in this state you are normally not able to interact with the program or close it normally via the Quit menu option. When this occurs the only way to close the program is to use Force Quit, which will forcefully close the programs. This tutorial will walk you through terminating an unresponsive program on your Mac.
WARNING: When you forcefully close a program as shown in the steps below, any unsaved data will be lost. You should only close programs this way if the application is hung and you cannot quit it normally.
To forcefully quit a program, please click on the Apple icon (Apple Menu icon) in the top left corner of your MacOS desktop and select Force Quit Finder as shown below.

Apple Menu

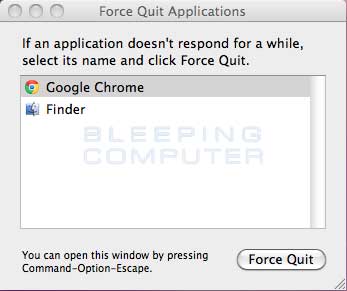
This will bring up the Force Quit Applications menu that displays a list of all the running applications that you can close.

Force Quit Applications Menu

Left click on the application you would like to close so that it is selected and then click on the Force Quit button. You will now be shown a prompt confirming whether or not you want to continue terminating the program.

Force Quit Confirmation

Click on the Force Quit button again and the program will be forcefully closed on your Mac.


source

Tuesday 8 October 2013

2013 iMac Review: Apple’s All-In-One Benefits Big From Improved Processor, Graphics

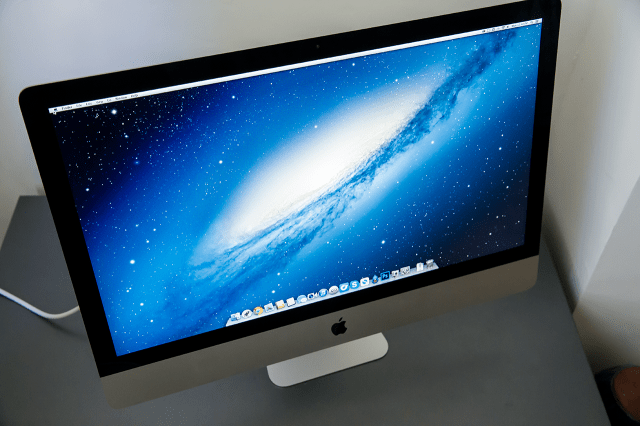
imac-1
The new iMac Apple introduced without much fanfare a couple of weeks ago is an evolutionary upgrade, retaining the slimline design it debuted with last year’s pre-holiday refresh, and introducing some major specification bumps under the hood. For owners of any of those machines, it probably won’t be surprising to hear that this year’s upgrade takes what was a great computer and makes it even better, especially for demanding users.
basics-subhead
As reviewed:
  • 27-inch, 2560×1440 display
  • 3TB Fusion Drive
  • 3.5GHz quad-core Intel Core i7 processor
  • 8GB of 1600MHz DDR3 RAM
  • Nvidia GeForce GTX 780M w/ 4GB dedicated RAM
  • 802.11ac Wi-Fi, Bluetooth 4.0
  • MSRP (as tested): $2,699
  • Product info page
design-subhead
Apple’s redesigned iMac is as nice this year as it was last – the slimmer profile affords it some much-needed weight savings, and the cleaner look leads to a much better overall aesthetic for a home office setup. The 27-inch model, which I reviewed, is still going to be a beefy device, but it’s no longer an absolute horror to move and reposition.
imac-back
imac-topdown
imac-off
imac-rear
The redesign does change some aspects that users coming from previous generations should note, however – there’s no longer any optical disk drive, and the SD card slot has shifted from the side to the back, owing to the much narrower edges of the new iMac. These are worthwhile sacrifices, in my opinion, since I haven’t used an optical disc since who knows when, and while the SD slot was easier to access on the side, it’s something you get used to reaching sight unseen on the new chassis pretty quickly if you need to use it frequently.
Also for those coming from devices older than the 2012 model iMac, you’ll probably notice less glare on the glass display, and better color rendering (in my unscientific opinion). Overall, the iMac’s design, while unchanged from last year, continues to place it atop the market in terms of attractive looks for an all-in-one computer.
features-subhead
The new iMac offers up improved configuration options for one of Apple’s most interesting recent tech innovations – Fusion Drive. The Fusion Drive is a cocktail of software and hardware that allows Apple to offer capacious storage capacities not available affordable in SSD, but with the speed and performance benefits that come from SSD. It does this by pairing a platter drive with a small segment of flash storage, and then intelligently keeping information that’s likely to be accessed on the flash portion, while constantly shuttling less immediately relevant data on to the platter hard disk drive.
The result, for most users, is an experience that compares very well to having a totally solid state drive in terms of boot speeds, wake from sleep times, program launches and program performance. One of the big downsides of switching between a 2011 27-inch iMac and my 15-inch Retina MacBook Pro has always been that the iMac always feels like a relative dinosaur with its 5,400 RPM HDD, but that perceived gap is completely erased with the Fusion Drive in the new 2013 27-inch iMac. This is my first experience with Fusion, and it genuinely does seem like the best option for anyone wanting both storage space and speed without much compromise.
Another huge benefit of the iMac if you’re new to it, especially if you’re adding a home computer to your existing Mac notebook, is Target Display mode. Connected to another Mac via Thunderbolt, the iMac can act as a second display. It’s actually better in some ways than getting a Cinema Display, since you have the option to use it on its own, but have a smaller/lighter package to work with. It’s not a new feature, but it’s a good one to keep in mind with this device for new buyers.
display-subhead
displayThe iMac’s display is likewise the same as the one found in its predecessor, but it’s an excellent screen that’s worth noting. The 2560×1440 display isn’t so-called Retina quality technically, but it gives you plenty of screen real estate to work with, and offers excellent color rendering, brightness and contrast. Plus, viewed from a reasonable distance, text still appears plenty crisp, and the screen does great work operating double-duty as a TV for watching movies and shows from a distance.
Working with two browser windows side-by-side works perfectly on the new iMac, as does tiling a number of applications including a browser, IM client, Twitter client and others. It’s also a great screen for working with windows, and compared to older models, the glare is much diminished. I’m using the review unit in a well-lit room with a window directly behind me facing the screen, and I’m still able to work on image-intensive tasks like photo editing without noticing too much glare.
performance-subhead
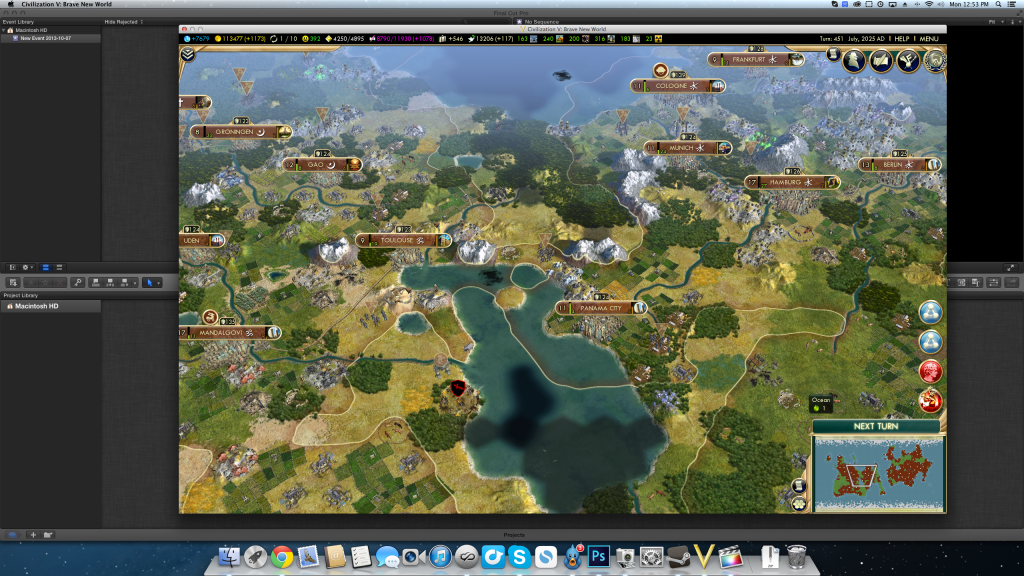
Here’s where the new iMac shines, thanks to latest generation Intel Haswell processors, and much improved graphic card options on all levels of the device. The one I’ve got has the top-of-the-line Nvidia 700-series option, a GeForce GTX 780M with 4GB of dedicated video memory. It’s powerful enough that it hardly breaks a sweat running Civilization V in windowed mode at 1920×1080 resolution in addition to powering Photoshop CC, Final Cut Pro X, and any number of browser tabs and communication software.
Screen Shot 2013-10-07 at 12.53.08 PMThe improved processor also makes everything feel lightning quick, and again, my first experience with a Fusion Drive from Apple has proven very eye-opening. Unless you’re working frequently with extremely large files which are processing in real-time, I see little reason to pay up to three times as more for dedicated SSD storage vs. Apple’s sophisticated hybrid tech. I’ve used aftermarket hybrid drives in the past, too, but because Apple’s solution is tied directly to firmware and system software, it provides much better performance benefits overall. The average user definitely wouldn’t be able to tell Fusion from all-flash storage.
In general, gaming performance was excellent on the new iMac, including sample http://www.blogger.com/blogger.g?blogID=6059425632943952107#editor/target=post;postID=763233401594302604tests performed using the recently released Mac App Store versions of Bioshock Infinite and Lord of the Rings: War in the North. This iMac isn’t one that will back down to a gaming challenge, though the most demanding gamers will probably still want to spec out and build their own custom Windows gaming PC if only because of library size.
The Bottom Line
Apple has provided a fairly standard upgrade for the iMac with these most recent versions, much like it does between major generational shifts for the Mac that happen every few years. But the hidden nature of these changes belies their benefits, especially for users working at the top level of the iMac’s capabilities. A fully-specced machine isn’t for everyone (the price tag alone will put most off), but barring anything truly shocking in terms of a price tag for the upcoming Mac Pro, the top of the line new iMac is the creative professional’s current best friend. And no matter the price point/configuration, Apple still definitely makes the best all-in-one available.

Saturday 5 October 2013

How to to disable and enable Taskbar Thumbnail Preview in Windows 7

Introduction
A feature of Windows 7 is that it will show you a preview, or small thumbnail image, of the open windows for a particular program when you hover over it. For example, if you have 3 Internet Explorer windows open and hover your mouse cursor over the Internet Explorer icon on your taskbar, it will pop-up 3 small images of each of your Internet Explorer windows and allow you to select the one you want to make active. An example of this feature can be seen in the image below.
Example of the Windows 7 Taskbar Thumbnail Preview
Though, in theory this feature is a good one, for many other people it is really annoying and can actually get in the way of productivity when these thumbnails pop-up over work you are trying to do.
Unfortunately, Microsoft decided to not provide a method that can be used to disable this feature in Windows 7. Thankfully, ways have been figured out how to, if not totally disable it, at least make it so it is not annoying anymore. The first way is to set a particular Windows Registry entry so that the thumbnail previews will not pop-up instantly, but instead pop-up after a certain amount of seconds of hovering, essentially disabling this feature. The second method is to use a program called 7 Taskbar Tweak to disable it for us. At the time of this writing, the site for 7 Taskbar Tweaker is down so we will provide both methods in this tutorial.
How to to disable Taskbar Thumbnail Preview in Windows 7 using the Registry
Warning: Improperly modifying the Windows Registry can cause Windows to not operate correctly. Therefore if you do not feel comfortable editing the Windows Registry then you can download a registry file to perform these steps for you. Otherwise, please continue with these steps:
  1. Close all open windows so you are at your desktop.
     
  2. Click on the start button and enter Regedit in the search field.
     
  3. When User Account Control asks if you would like to allow this program to make changes, click on the Yes button.
     
  4. Navigate to the following Registry key: HKEY_CURRENT_USER\Software\Microsoft\Windows\CurrentVersion\Explorer\Advanced
     
  5. Create a new DWORD (32-bit) value named ExtendedUIHoverTime under the above key.
     
  6. When the value has been created, double-click on the ExtendedUIHoverTime value and click on the Decimal option.
     
  7. In the Value data: field enter the delay you want. For every second you want the delay you should add 1000. So if you want a 10 second delay you should enter 10000 into this field.
     
  8. When done press the OK button and then close the Registry Editor.
     
  9. To put these changes into effect you can reboot, logoff and logon again, or kill the Explorer.exe process, which will automatically restart.
The Windows 7 Thumbnail Taskbar Preview should now be so delayed that it is effectively no longer working.
If you did not feel comfortable modifying the Windows Registry, then you can just download the following file to your desktop and double-click on it. When Windows asks if you want to continue to add the data from the reg file, allow it to do so, and the ExtendedUIHoverTime value will be added for you automatically with a delay of 10 seconds. Then reboot or logoff/logon for these changes to go into affect.
How to to enable Taskbar Thumbnail Preview in Windows 7 using the Registry
Warning: Improperly modifying the Windows Registry can cause Windows to not operate correctly. Therefore if you do not feel comfortable editing the Windows Registry then you can download a registry file to perform these steps for you. Otherwise, please continue with these steps:
  1. Close all open windows so you are at your desktop.
     
  2. Click on the start button and enter Regedit in the search field.
     
  3. When User Account Control asks if you would like to allow this program to make changes, click on the Yes button.
     
  4. Navigate to the following Registry key: HKEY_CURRENT_USER\Software\Microsoft\Windows\CurrentVersion\Explorer\Advanced
     
  5. On the right hand portion of the Registry Editor screen, scroll through the list of values till you see the ExtendedUIHoverTime value. Then right-click on the ExtendedUIHoverTime and select Delete to delete the value.
     
  6. When done you can close the Registry Editor.
     
  7. To put these changes into effect you can reboot, logoff and logon again, or kill the Explorer.exe process, which will automatically restart.
The Windows 7 Thumbnail Taskbar Preview should now be enabled again.
If you did not feel comfortable modifying the Windows Registry, then you can just download the following file to your desktop and double-click on it. When Windows asks if you want to merge the data, allow it to do so, and the ExtendedUIHoverTime value will be removed from the Registry. Then reboot or logoff/logon for these changes to go into affect.
How to use 7 Taskbar Tweaker to disable the Taskbar Thumbnail Preview
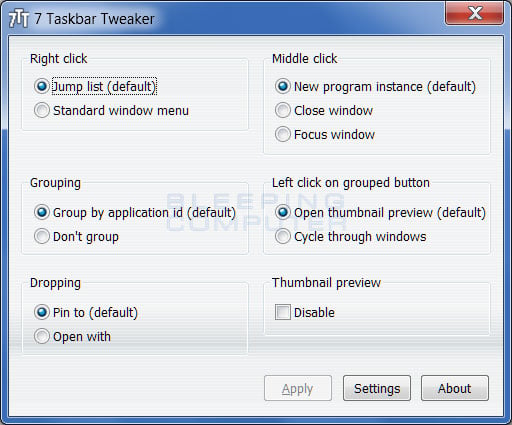
An easier way to disable and enable the Windows 7 Taskbar Thumbnail Preview is to use a program called 7 Taskbar Tweaker. This program comes in 32-bit and 64-bit flavors and you must use the appropriate version for your version of Windows. Once downloaded, run the program and you will be presented with a screen similar to the one below.
7 Taskbar Tweaker
7 Taskbar Tweaker
To enable and disable the preview simply check or uncheck the Disable checkbox under Thumbnail Preview. When ready, click on the Apply button to save your settings. You can now close the 7 Taskbar Tweaker program.

How to enable GodMode in Windows

Windows 8, Windows 7, Server 2008, and flavors of Windows Vista provide an unpublished ability to create a control panel called GodMode that allows you to have easy access to almost all administrative tasks that you would like to use in Windows. This new window is called GodMode because it puts all aspects of the management of Windows at your fingertips in one location. This allows you to quickly configure Windows settings or hardware from one screen. In order to access GodMode you must first create a special folder on your desktop as described below.
It is important to note that GodMode only works for 32-bit and 64-bit versions of Windows 8, Windows 7, 32-bit versions of Windows Server 2008, and 32-bit versions of Windows Vista. It is know, though, to crash Windows Vista 64-bit, so please do not create this folder on those versions of Windows Vista. If you decide to test it on 64-bit versions of Windows Vista, you may need to reboot into safe mode to remove this folder.
To enable the GodMode folder on your desktop, please follow the steps below.
  1. Close all open windows so you are at your desktop.
     
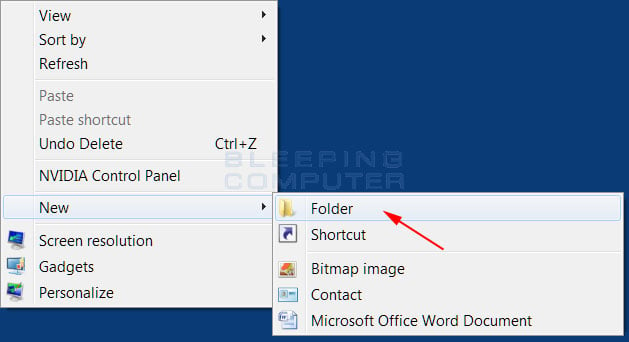
  2. Right-click on an empty portion of your desktop and select New and then select Folder as shown in the image below.

     
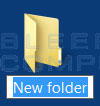
    A new folder will appear on your desktop with the title of the folder in edit mode as shown below.
     
     
  3. Edit the title of the new folder so that it is named the following and then press enter.
    GodMode.{ED7BA470-8E54-465E-825C-99712043E01C}
  4. When done, you should have an icon on your desktop that has the above title and looks like the icon in the image below.
     
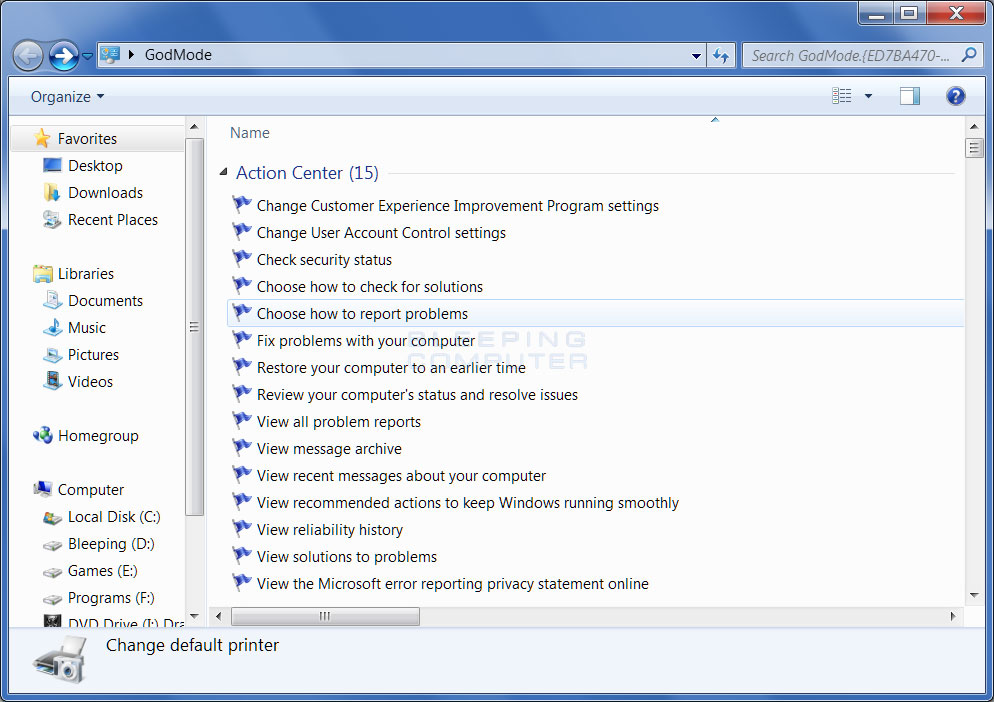
  5. Double-click on this icon to open GodMode. When GodMode opens, you will be presented with a screen similar to the one below.


    You can now scroll through the list of available configuration options and tasks that are available for your version of Windows and tweak Windows from one location.

How to enable or disable the Quick Launch toolbar in Windows 7 and Windows 8

Introduction
The Quick Launch toolbar is a small toolbar that resides in your Windows taskbar that allows you to quickly launch programs that you place in it. Starting in Windows 7, the Quick Launch toolbar is no longer shown by default and is hard to find as Windows 7 and Windows 8 prefers the technique of pining programs to your taskbar for easy launching. Unfortunately, many people still like the Quick Launch approach to launching programs and miss this feature. Thankfully, the Quick Launch toolbar is still available, but hidden in the hard to find %UserProfile%\AppData\Roaming\Microsoft\Internet Explorer\Quick Launch folder. This guide will explain how to enable this toolbar in Windows 7 and Windows 8 as well as configure it to your liking.

How to enable the Quick Launch toolbar in Windows 7 and Windows 8
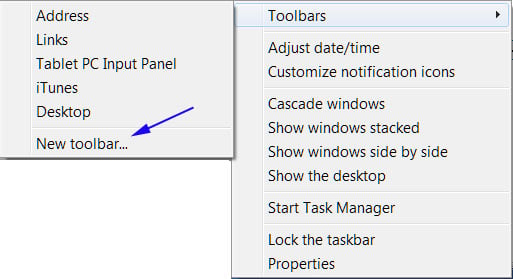
To add a new toolbar to your taskbar you need to right-click on an empty portion of the taskbar and then select Toolbars and then the New Toolbar... menu option. This is shown by the blue arrow in the figure below.

New toolbar menu option
New Toolbars menu option
 
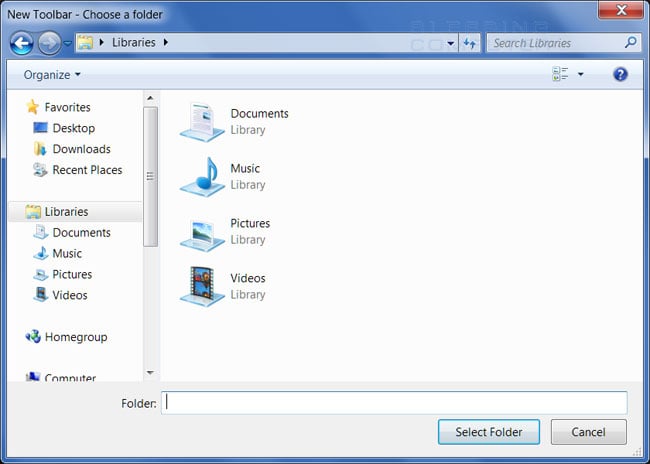
You will now be shown a screen where you can select a toolbar folder that should be added to the taskbar as shown in the image below.
 

Choose a new toolbar folder
 
In the Folder: field paste or type the following path:
%UserProfile%\AppData\Roaming\Microsoft\Internet Explorer\Quick Launch
Then press the Select Folder button.
 
Quick Launch Toolbar
 
You will now see a new toolbar labeled Quick Launch on the bottom right of your Windows 7 and Windows 8 taskbar as shown in the image above.
 
How to change the look and feel of the Quick Launch toolbar
It is possible to change how the Quick Launch icons will look. To access these settings you right-click on the Quick Launch toolbar and you will see a menu similar to the one below.
 
Settings
Toolbar settings
 
The settings that can be changed are:
  • Show Text - If you enable this option, it will show the description of the icon in the toolbar. As this takes up too much precious space, I suggest you do not enable this option as you can always hover your mouse over an icon to get its description.
     
  • Show title - If this is enabled it will display the title of the Toolbar, ie: Quick Launch, instead of the shortcuts. This too takes up too much space and I suggest you do not use this option.
     
  • View - This option allows you change the size of the icons in the Quick Launch toolbar. If you select Large Icons it will make the icons larger, making them more visible but at the same time using up more toolbar space. If you select Small Icons, the icons will be harder to see but you will have the ability to show more icons in the same amount of space. Examples of the large and small icons can be seen below.
 
Small icon setting
Large icon setting
Large and Small Icons settings
 
You can also change the size of the toolbar, so that you can see more icons, by dragging the three dotted vertical lines. Before you can do this, though, you will need to unlock the Windows 7 and Windows 8 taskbar first. Once the toolbar is unlocked you can expand it as needed. To expand a toolbar that is on the left side of the screen, you would expand the toolbar using the right dotted vertical lines. If the toolbar is on the right side of the screen, then you would expand the toolbar using the left dotted vertical lines.
 
How to move the Quick Launch toolbar to the left side of the taskbar
When the Quick Launch toolbar is first installed it will be automatically added to the right side of the taskbar. If you are more comfortable with the Quick Launch toolbar being on the left side of the screen it is possible to drag it over to the left side. To do this, you must first unlock the taskbar and then, using your mouse, drag the left vertical dotted lines to the left side of the screen. The image below will show you the dotted lines that you need to drag.
 
Quick Launch toolbar on the right side
 
Once you drag the toolbar to the left side of the screen, you will need to expand or shorten the toolbar as necessary by dragging the three dotted vertical bars on the right of the toolbar. When you are satisfied with the positioning of the toolbar you should lock the Windows 7 and Windows 8 taskbar.
 
How to disable the Quick Launch toolbar in Windows 7 and Windows 8
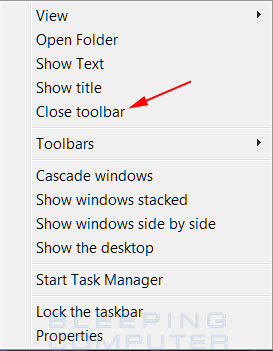
To remove the Windows 7 and Windows 8 Quick Launch toolbar simply right-click on an empty portion of the toolbar to bring up the toolbar's menu as shown in the image below.

Close the Quick Launch Toolbar
 
Then click on the Close toolbar menu option as shown by the red arrow in the image above. You will then be prompted as to whether or not you want to close the toolbar. If you want to close it, then you should press the OK button, otherwise press the Cancel button. The Quick Launch toolbar will now be removed from your Windows 7 taskbar.

How to Lock and Unlock the Windows 7 Taskbar

Method 1 - Taskbar menu
This method will walk you through unlocking and locking the taskbar by using the taskbar menu.
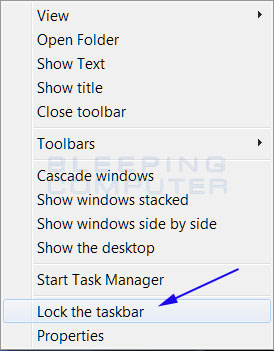
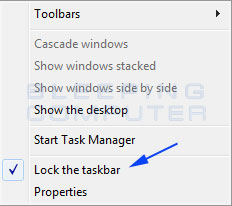
  1. Right-click on an empty space on your taskbar so that a menu like the following image appears.


    Windows 7 Taskbar menu Windows 8 Taskbar Menu
    Windows 7 Taskbar menu Windows 8 Task Bark Menu

     
  2. Then select the Lock the taskbar menu option to put a checkmark next to it and lock the toolbar. If it already has a check next to it, then click on it to remove the check and thus unlock the taskbar. This menu option is designated by the blue arrow in the images above.
Your Windows 7 and Windows 8 taskbar should now be locked or unlocked depending on the setting you chose.

Method 2 - Taskbar tab of the Start Menu properties
This method will show you how to unlock or lock the Windows 7 taskbar through the Start Menu properties.
  1. Right-click on the Windows 7 Start Menu (Start Menu button) and then select the Properties menu option as shown in the image below.


    Right click on the start menu
     
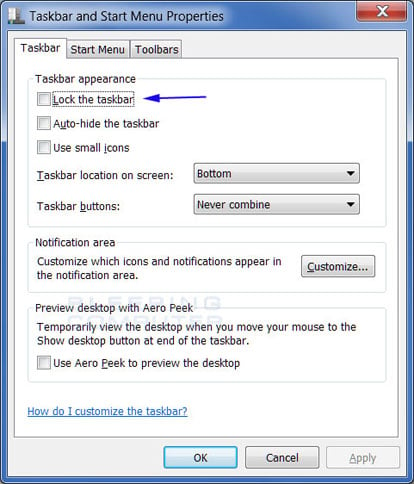
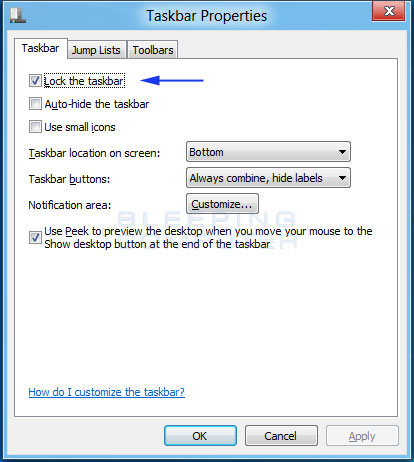
  2. You will now be at the Start Menu properties page. Now click on the Taskbar tab and you will be at the Taskbar properties screen as shown in the image below.


    Windows 7 Taskbar properties screen Windows 8 Taskbar properties screen
    Windows 7 Taskbar properties screen Windows 8 Taskbar properties screen
  3. To unlock the taskbar, simply remove the checkmark from the checkbox labeled Lock the taskbar. To Lock the taskbar, simply put a checkmark in that checkbox.
Your Windows 7 and Windows 8 taskbar should now be locked or unlocked depending on the setting you chose.

source

How to install and use Windows XP Mode in Windows 7

Introduction
Windows Virtual PC is a downloadable add-on to Windows 7 Professional, Ultimate, or Enterprise that allows you to run a Windows XP environments from within Windows 7. Windows XP Mode, which requires Windows Virtual PC, is a prepackaged fully activated copy of Windows XP Professional with Service Pack 3 installed. With both of these programs installed, you can then run Windows XP in Windows 7 so that you can continue to use programs that were developed for Windows XP but no longer run in Windows 7.
In order to use the Virtual PC technology your computer's CPU must have hardware virtualization support and it this hardware virtualization must be enabled. For Intel processors this support is called Intel Virtualization Technology and for AMD processors it is called AMD-V. To determine if your processor has hardware virtualization please consult the following section.
Also when reading this tutorial you will find that I use the word host often. This terms refers to the Windows 7 operating system that the Windows XP Mode installation is running upon.

How to determine if the processor supports hardware virtualization
If you have an Intel Processor then you need to do the following to determine if your processor has hardware virtualization:
First, download and install the Intel Processor Identification Utility and run it one your computer. Once the program is installed launch the program. It can be found under the Start Menu -> All Programs -> Intel(R) Processor ID Utility. Once launched you will need to accept the license agreement and then you will be at a screen similar to the following image:
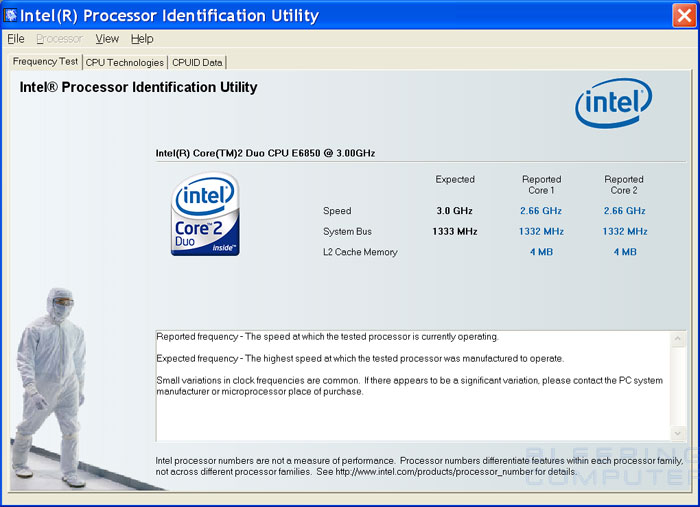
Intel Processor Identification Utility
 
You should now click on the CPU Technologies tab and you will see a screen as shown below.
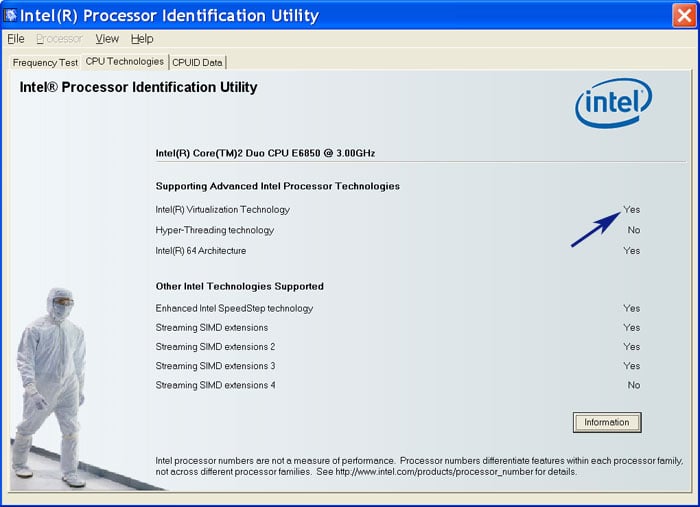
 
CPU Technologies Screen
 
On this screen, look for the row labeled Intel(R) Virtualization Technology, as shown by the arrow in the image above. If it states Yes, then you can use Virtual PC and Windows XP Mode in Windows 7, and should continue to the section where we learn how to install it. If it does not say Yes, then you will not be able to use Windows XP Mode on your computer. You can now close the Intel Processor Identification Utility.
If you have an AMD Processor then you need to do the following to determine if your processor has hardware virtualization:
If you have an AMD processor then you will need to download the AMD Virtualization Technology and Microsoft Hyper-V System Compatibility Check Utility. Once downloaded, extract the files and navigate to the folder where the files are extracted. In order to run the utility in Windows 7, you will need to run it with elevated privileges. To do this, right-click on the amdvhyperv.exe file and select Run as administrator. When the program loads it will tell you whether or not your AMD processor supports Hyper-V as shown below.
 
 
If it does not support Hyper-V, then you will not be able to use Windows XP Mode in Windows 7.
 
Configure your bios to support hardware virtualization
If the above tests state that your processor does not support hardware virtualization, it may be you need to enable this feature your motherboard's BIOS. As motherboards have different methods of entering the bios and configuring it, giving you step-by-step instructions is impossible. Typically, though, to enter your bios you will boot your computer and then look for a prompt asking if you would like to enter setup or configure your bios and then stating what key you need to press on your computer in order to do so. Typically these keys are F1, F2, DELETE, F10, F11, or F12. I suggest that you turn off computer and then start it up before attempting to access the BIOS, as otherwise the screen may not always show. On certain machines, you may also see a computer or motherboard brand logo that makes it so you cannot see the prompt to enter the BIOS. If you see a large logo covering the screen, simply press the ESC key on your keyboard in order to see your BIOS setup instructions.
Once in the BIOS, you will need to search for virtualization settings and make sure they are enabled. As each brand or manufacturer of computers and motherboards, or even models of the same brand, may have different locations as to where this setting is located in the BIOS, you will need to search through the settings till you find it. Look for the settings for Virtualization, AMD-V, or Virtual Machine and make sure it is enabled. Once this is done, you can try the above tests again, and if they now say you support virtualization you can continue with the rest of the tutorial.
 
Download and install Virtual PC and Windows XP Mode for Windows 7
Now that Virtualization is enabled on your computer, we need to download Windows Virtual PC and Windows XP Mode. To do this, visit the Windows Virtual PC Download page. Once there, scroll down till you see Step 1 and select the type of Windows 7 installed and your language. Then click on the Download Windows Virtual PC RC and the Windows XP Mode RC buttons to download each file.
Once the files are downloaded, you should install the Windows Virtual PC Beta first. This file is the smaller of the two, currently at 6.64 MB, is named Windows6.1-KB958559-x86.msu for 32 bit Windows or Windows6.1-KB958559-x64.msu for 64 bit Windows. When you double-click on the file, it will scan your computer for a certain update, and if not found, will prompt you to download the KB958559 update as shown below.
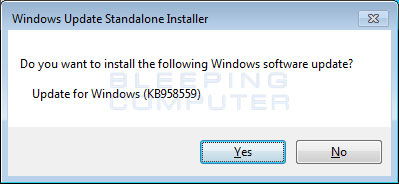
Install the KB958559 Windows 7 update
 
You should click on the Yes key to allow this update to be installed. When the update has finished installing, you will be at the license screen. Click on the I accept button to finish the installation of the program. When it has finished installing, it will prompt you to reboot your computer. Please allow it to do so.
When you are back at your desktop, you should now double-click on the Windows XP Mode Beta installation file, which is named WindowsXPMode_en-us.exe. When the installation program opens, follow the prompt to install the program onto your computer. The installation may take a while as the package is over 400MB, so please be patient. While installing, Windows will display a User Account Control prompt asking if you wish to have this software installed on the computer. At this prompt, click on the Yes button to continue. After the Windows XP Mode software has been installed, press the Finish button and Windows XP Mode will start. Please continue to the next section to learn how to configure Windows XP Mode when it runs for the first time.
 
Starting Windows XP Mode for the first time
When you start Windows XP Mode for the first you will need to first accept the license agreement and then press the Next button. You will now be at a screen, as shown below, where you are asked to input the password for the user that XP Mode programs will run under.
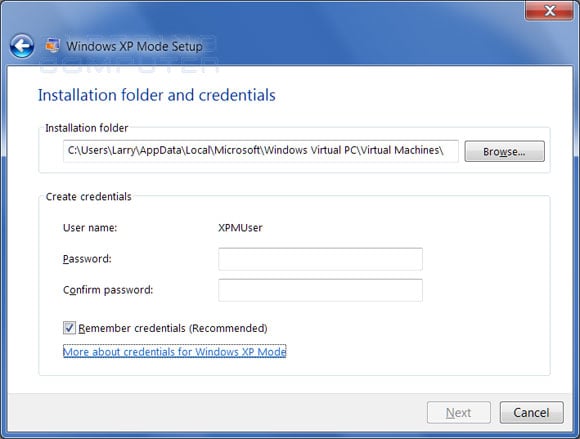
 
XP Mode Credentials
XP Mode Credentials
 
Create a password and enter it into the two password fields. If you do not want to enter the password every time you start Windows XP Mode, then put a checkmark in the Remember credentials checkbox. When done, click on the Next button.
You will now be asked if you would like to enable Automatic Updates. You should put a checkmark in the Help protect my computer by turning on Automatic Updates and then click on the Start Setup button. Windows Virtual PC will now setup Windows XP Mode for its first time use. This may take a while, so please be patient.
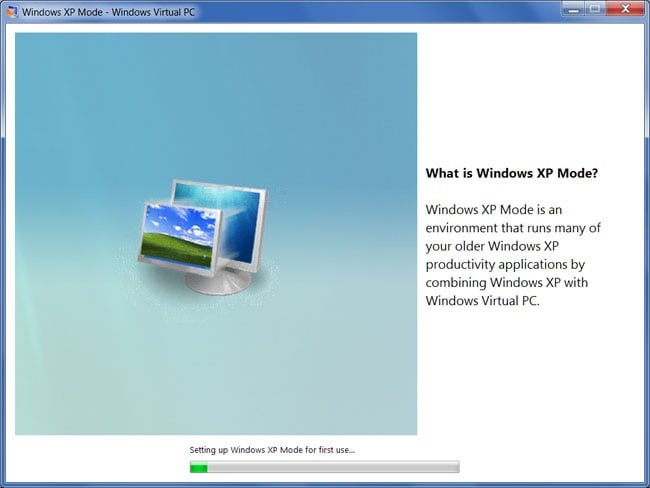
 
Windows XP Mode being setup for its first use
 
When the setup has been completed you will now be in Windows XP Mode and will be presented with a Windows XP Professional desktop.
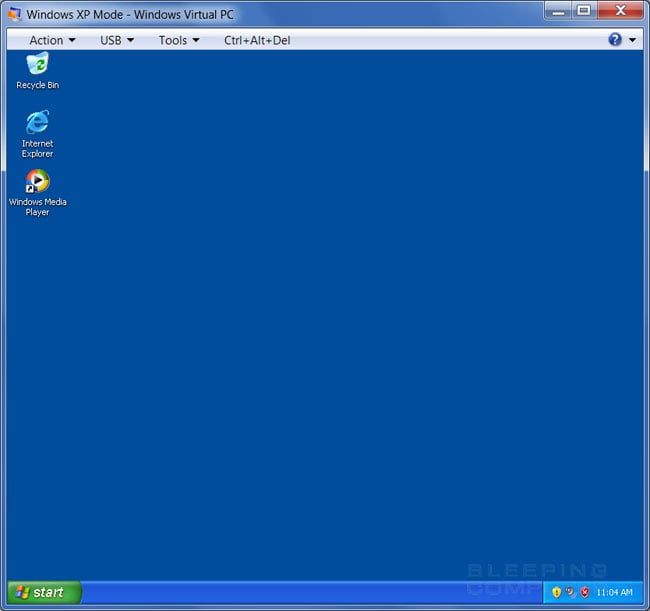
 
Windows XP Mode Desktop
 
While Windows XP Mode is running, the Virtual PC program will automatically integrate all of your host computer's resources into Windows XP Mode so that you can use them. This includes your your computer's DVD/CD drives, hard drives, sound card, printers, and USB devices.
To close Windows XP Mode you can click on the Actions menu and select Close to hibernate your session and close the window. If you would like to actually shutdown the Windows XP Mode, you need to click on the Ctrl+Alt+Del menu and then click on the Shut down button on the screen that pops up.
To star Windows XP Mode again you simply click on the Start Menu, select All Programs, scroll down to Windows Virtual PC, and then select Windows XP Mode.
 
How to install and launch Windows XP Mode applications
To install applications in Windows XP Mode, you would install them like they usually do. You can either download the programs over the network or the web and install them directly from the Windows XP Mode hard drives or you can install them via your host's shared resources like the CD/DVD drives attached to your host computer. The only difference is that the applications will be running in a virtual Windows XP environment and therefore will run even if they are not compatible with Windows 7. This will allow you to install any legacy applications that you need to continue to have available.
A feature of Windows XP Mode is that any application you install that uses Windows Installer will also have a shortcut automatically added to the a Windows XP Mode Applications folder in your Windows 7 Start Menu. If the program you install does not appear in the host's Windows XP Mode Applications folder, you can manually make a shortcut appear by creating a shortcut to the program in the C:\documents and settings\All Users\Start Menu\Programs folder on your Windows XP Mode installation. You then need to log off in Windows XP Mode and the program will now appear in the Windows XP Mode Applications folder on your host computer.
When you launch these programs from the Start Menu, they will appear as a normal program running on your computer rather than one running in a virtual desktop. In fact, when you launch one of these applications you will never see the Windows XP Mode desktop and the application will be running directly on your normal desktop. To launch Windows XP Mode applications you would need to navigate via the Start Menu to All Programs, scroll down to Windows Virtual PC, and then Windows XP Mode Applications. Under that sub folder you will see a list of applications that you can directly launch from within Windows 7.
When running XP Mode Applications directly from the desktop, it is important to understand that Windows XP Mode is started, but is being run behind the scenes so that the actual desktop is hidden. The running XP Mode Applications, though, still use the data and drives that are normally on the Windows XP Mode desktop. That means any XP Mode programs will be opening the XP Mode drives, and not the local drives of your host Windows 7 operating system unless they are shared.
When you are done running an XP Mode application, you simply close it like normal. This will put the Windows XP Mode virtual pc into a hibernating state.
It is also important to note that when starting XP Mode applications, they will start much faster if XP Mode is a hibernating state rather than shutdown. Therefore, if you routinely use XP Mode applications, I suggest you do not shut down your XP Mode when not using it and instead leave it hibernating.
 
Change integration features and settings
When running XP Mode it is possible to change the hardware and data that is automatically integrated into the virtual pc. To change these settings, when in the XP Mode desktop click on the Tools menu and then select Settings.... You will now be at the virtual pc settings screen and should click on the Integration Features category. From here you can specify what hardware and features you would like to integrate, or share, with your XP Mode desktop.
These features are:
  • Audio - This should remain unchecked so that you have better performance. It should be noted that even with this unchecked, any sound from the XP Mode desktop will still play through your host's audio card.
  • Clipboard - If this is enabled then you will be able to copy and paste between XP Mode and your normal desktop.
  • Printer - Shares your host's printer with XP Mode.
  • Smart Cards - Allows XP Mode to access the host's smart cards.
  • Drives - Allows XP Mode to access the host's drives, which include hard drives, CD/DVD drives, and removable media.
Any changes you make to the settings above will be persistent each time you start XP Mode. On the other hand, if you need to disable the integration for a particular session you can click on the Tools menu and then select Disable Integration Features. This will make it so that you do not have access to any of the host's resources. To enable access to these resources, simply click on the Enable Integration Features option in the Tools menu.
 
Change XP Mode Virtual Machine Settings
If you find that XP Mode is not running as fast as you would like, or you want to add more features, you need to tweak some settings in your Virtual PC settings for XP Mode. In order to change these settings you must first shut down XP Mode so that it is not in a hibernating state. To do this, click on the Ctrl+Alt+Del menu and then click the Shut down button on the screen that pops up.
When XP Mode has shut down, click on the Start Menu, select All Programs, scroll down to Windows Virtual PC, and then select the Windows Virtual PC icon. You should now see a list of your Virtual PCs, including Windows XP Mode. Right-click on Windows XP Mode and then select Settings. Now that Windows XP Mode is shut down, you can change the settings for your virtual machine.
Settings that you may want to consider changing to increase performance and reliability are:
  • Memory - If you find that your applications are running slowly, then you may want to bump this up so that your applications have access to more system memory.
  • Hard Disks - You are able to add 2 more hard disks to your Windows XP Mode. So if you need to add another drive to your Windows XP Mode, you can do so here. This will allow you to create a second disk on another physical drive in your computer to enhance performance.
  • Undo Disks - Undo disks allow you to create a base image of your Windows XP Mode installation and then save all changes into an undo disk. Then if you ever need to start over from your base image, you just go back into settings and discard the changes in your undo disk. The next time you start Windows XP Mode, you will be back at the base setup with all of the changes you have made discarded. I suggest that everyone turn this option on as it only increases the safety of your Windows XP Mode installation.
Once you have finished making your changes, simply click on the OK button to save the changes. When you next start Windows XP Mode, these settings will now be in effect.

source
How to show hidden files in Windows 7

Windows 7 hides certain files so that they are not able to be seen when you exploring the files on your computer. The files it hides are typically Windows 7 System files that if tampered with could cause problems with the proper operation of the computer. It is possible, though, for a user or piece of software to set make a file hidden by enabling the hidden attribute in a particular file or folder's properties. Due to this it can be beneficial at times to be able to see any hidden files that may be on your computer. This tutorial will explain how to show all hidden files in Windows 7.
To enable the viewing of hidden and protected system files in Windows 7 please follow these steps:
  1. Close all programs so that you are at your desktop.
     
  2. Click on the Start button. This is the small round button () in the lower left corner of your screen that has a Windows flag on it.
     
  3. Click on the Control Panel menu option.
     
  4. When the control panel opens you will see a screen similar to Figure 1 below.


    Figure 1. Windows 7 Control Panel
    Figure 1. Windows 7 Control Panel


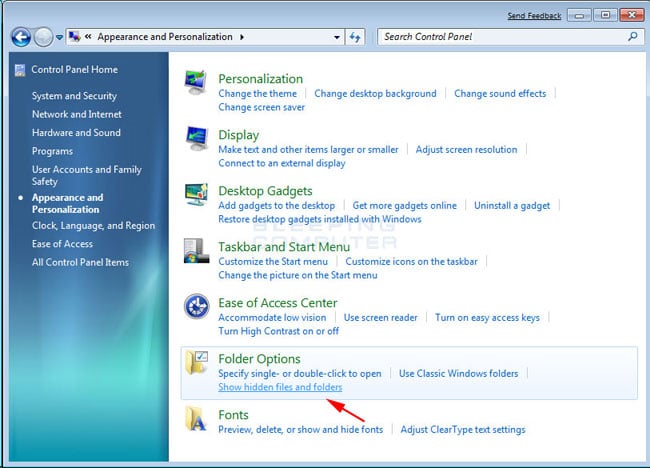
  5. Click on the Appearance and Personalization link.
     
  6. You will now be in the Appearance and Personalization control panel as shown in Figure 2 below.


    Figure 2. Windows 7 Appearance and Personalization screen
    Figure 2. Windows 7 Appearance and Personalization screen


    Now click on the Show hidden files and folders option as shown by the red arrow in Figure 2 above.
     
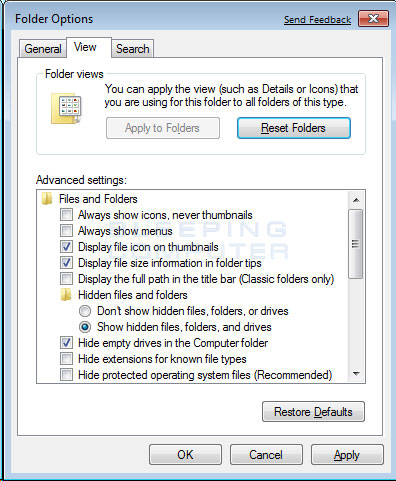
  7. Under the Hidden files and folders section select the radio button labeled Show hidden files, folders, and drives.
     
  8. Remove the checkmark from the checkbox labeled Hide extensions for known file types.
     
  9. Remove the checkmark from the checkbox labeled Hide protected operating system files (Recommended).

    Once this is done, your Folder Options screen should look similar to the following image.


    Figure 3. Folder Options screen
    Figure 3. Folder Options screen


  10. Press the Apply button and then the OK button.
source