Introduction
The Quick Launch toolbar is a small toolbar that resides in your Windows taskbar that allows you to quickly launch programs that you place in it. Starting in Windows 7, the Quick Launch toolbar is no longer shown by default and is hard to find as Windows 7 and Windows 8 prefers the technique of pining programs to your taskbar for easy launching. Unfortunately, many people still like the Quick Launch approach to launching programs and miss this feature. Thankfully, the Quick Launch toolbar is still available, but hidden in the hard to find %UserProfile%\AppData\Roaming\Microsoft\Internet Explorer\Quick Launch folder. This guide will explain how to enable this toolbar in Windows 7 and Windows 8 as well as configure it to your liking.
How to enable the Quick Launch toolbar in Windows 7 and Windows 8
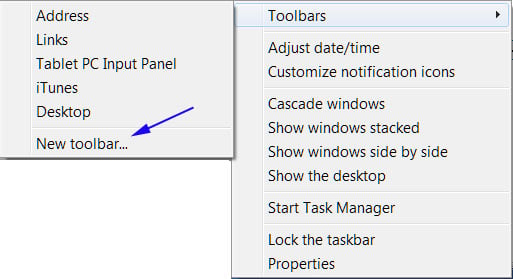
To add a new toolbar to your taskbar you need to right-click on an empty portion of the taskbar and then select Toolbars and then the New Toolbar... menu option. This is shown by the blue arrow in the figure below.
New Toolbars menu option
Choose a new toolbar folder

Quick Launch Toolbar
Toolbar settings
Large and Small Icons settings

Quick Launch toolbar on the right side
How to disable the Quick Launch toolbar in Windows 7 and Windows 8
To remove the Windows 7 and Windows 8 Quick Launch toolbar simply right-click on an empty portion of the toolbar to bring up the toolbar's menu as shown in the image below.
Close the Quick Launch Toolbar
The Quick Launch toolbar is a small toolbar that resides in your Windows taskbar that allows you to quickly launch programs that you place in it. Starting in Windows 7, the Quick Launch toolbar is no longer shown by default and is hard to find as Windows 7 and Windows 8 prefers the technique of pining programs to your taskbar for easy launching. Unfortunately, many people still like the Quick Launch approach to launching programs and miss this feature. Thankfully, the Quick Launch toolbar is still available, but hidden in the hard to find %UserProfile%\AppData\Roaming\Microsoft\Internet Explorer\Quick Launch folder. This guide will explain how to enable this toolbar in Windows 7 and Windows 8 as well as configure it to your liking.
How to enable the Quick Launch toolbar in Windows 7 and Windows 8
To add a new toolbar to your taskbar you need to right-click on an empty portion of the taskbar and then select Toolbars and then the New Toolbar... menu option. This is shown by the blue arrow in the figure below.
New Toolbars menu option
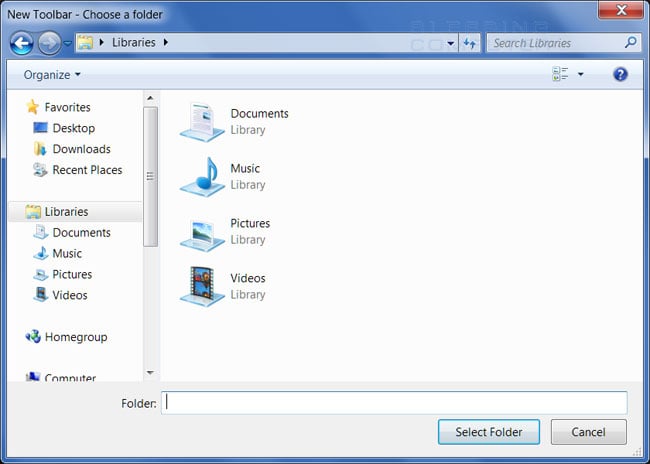
You will now be shown a screen where you can select a toolbar folder
that should be added to the taskbar as shown in the image below.
Choose a new toolbar folder
In the Folder: field paste or type the following path:
%UserProfile%\AppData\Roaming\Microsoft\Internet Explorer\Quick Launch
Then press the Select Folder button.
Quick Launch Toolbar
You will now see a new toolbar labeled Quick Launch on the bottom right
of your Windows 7 and Windows 8 taskbar as shown in the image above.
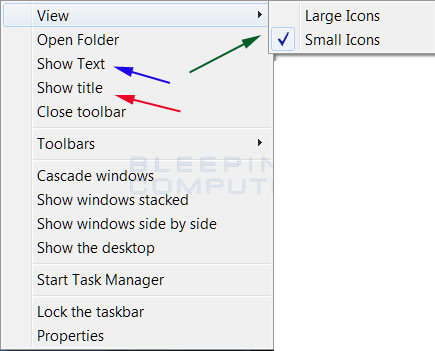
It is possible to change how the Quick Launch icons will look. To
access these settings you right-click on the Quick Launch toolbar and
you will see a menu similar to the one below.
Toolbar settings
The settings that can be changed are:
-
Show Text - If you enable this option, it will show
the description of the icon in the toolbar. As this takes up too much
precious space, I suggest you do not enable this option as you can
always hover your mouse over an icon to get its description.
-
Show title - If this is enabled it will display the
title of the Toolbar, ie: Quick Launch, instead of the shortcuts. This
too takes up too much space and I suggest you do not use this option.
- View - This option allows you change the size of the icons in the Quick Launch toolbar. If you select Large Icons it will make the icons larger, making them more visible but at the same time using up more toolbar space. If you select Small Icons, the icons will be harder to see but you will have the ability to show more icons in the same amount of space. Examples of the large and small icons can be seen below.
Large and Small Icons settings
You can also change the size of the toolbar, so that you can see more
icons, by dragging the three dotted vertical lines. Before you can do
this, though, you will need to unlock the Windows 7 and Windows 8 taskbar
first. Once the toolbar is unlocked you can expand it as needed. To
expand a toolbar that is on the left side of the screen, you would
expand the toolbar using the right dotted vertical lines. If the toolbar
is on the right side of the screen, then you would expand the toolbar
using the left dotted vertical lines.
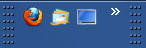
When the Quick Launch toolbar is first installed it will be
automatically added to the right side of the taskbar. If you are more
comfortable with the Quick Launch toolbar being on the left side of the
screen it is possible to drag it over to the left side. To do this, you
must first unlock the taskbar
and then, using your mouse, drag the left vertical dotted lines to the
left side of the screen. The image below will show you the dotted lines
that you need to drag.
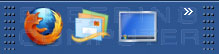
Quick Launch toolbar on the right side
Once you drag the toolbar to the left side of the screen, you will need
to expand or shorten the toolbar as necessary by dragging the three
dotted vertical bars on the right of the toolbar. When you are satisfied
with the positioning of the toolbar you should lock the Windows 7 and Windows 8 taskbar.
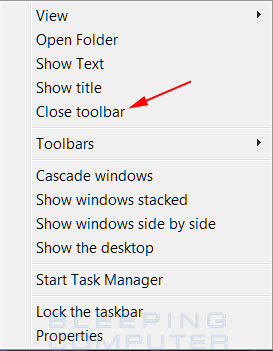
To remove the Windows 7 and Windows 8 Quick Launch toolbar simply right-click on an empty portion of the toolbar to bring up the toolbar's menu as shown in the image below.
Close the Quick Launch Toolbar
Then click on the Close toolbar menu option as shown
by the red arrow in the image above. You will then be prompted as to
whether or not you want to close the toolbar. If you want to close it,
then you should press the OK button, otherwise press the Cancel button. The Quick Launch toolbar will now be removed from your Windows 7 taskbar.
No comments:
Post a Comment